BizBook - Documentation by RN53 Themes
BizBookDirectory & Listings Template
This is the template documentation file. Please search this before submitting a support request. Note that we do not support template customizations beyond it's original functionality & appearance.
Getting Started A bit about getting started with your Html project.
Server & Hosting Requirements
Our Bizbook template create with latest PHP vesion. So kindly check your server support with PHP & MySql.
- Recommended hostings:
Bluehost, Hostinger, Hostgator, GoDaddy,and other top branding hostings. - While you using some
Free hosting or low-quality hostingwe got someissues like "Data not insert" and mailing issues. Some low-quality hosting having very limited optionsare there, if we face any issues means very hard to rectify, and hosting support is also hard to contact,so please go with above recommended hostings.
Installion
Follow these easy steps to install the template from scratch:
Install on live server
- Step 1: Create new DB & Import our demo DB - Demo video
- Step 2: Upload files - Demo video
- Step 3: Configuration(admin\config\db.php) - Demo video
- Step 4: Htaccess file configuration - Demo video
- Step 5: Admin configuration - Demo video
Install on local server
-
Step 1: Extract your downloaded Zip file
You can extract your donloaded file into local machine preferable path.
-
Step 2: Install Xampp local server software.
Download Xampp. This Xampp helping for run your directory template into your local server. You can download and install into your machine. If you install this on IOS meand you can use MAMP server.
-
Step 3: Start SQL server
Once you done your Xampp installation then open Xampp and click to start SQL
-
Step 4: Copy and Paste your files
Copy your Directory template files and past into htdocs folder(folder path: C:\xampp\htdocs)
-
Step 5: Create new Database
Kindly open this(http://localhost/phpmyadmin/) into your web browser, then create new Database. Note: kindly note your DB name.
-
Step: Import DB files
Import our DB files into your new DB. Choose your new Databse and click Import on top bar and Upload your DB file then click Go buttom.
-
Step: DB Configuration
Open db.php configuration file on this path(C:\xampp\htdocs\business-directory-template\admin\config)
define('DB_HOSTNAME','localhost');

                                define('DB_USERNAME','DB_username');

                                define('DB_PASSWORD','DB_password');

                                define('DB_NAME','DB_name');

                                $webpage_full_link = "http://directoryfinder.net/demo/business-directory-template/";
1. Change the username "DB_USERNAME" as "root"
2. Change the password "DB_PASSWORD" as make empty
3. Change the DB name "DB_NAME" as "YOUR DB NAME"
4. Change the website full path "https://directoryfinder.net/demo/business-directory-template/" as "YOUR LOCAL HOST PATH NAME (htts://localhost/business-directory-template/)"define('DB_HOSTNAME','localhost');
define('DB_USERNAME','root');
define('DB_PASSWORD','');
define('DB_NAME','my_dbname');
$webpage_full_link = "http://localhost/business-directory-template/"; -
Step: Save the changes
Kindly save your changes and open your local host path in your browser(htts://localhost/business-directory-template/)
-
Step: Done
Support
Thank you for using our template our support team is always with you and very happy to help you.
While you are getting any installation or other issues you can send your C-Panel details to us. We instantly help you to solve an issues.
- WhatsApp support: +91 79044 62944(we recommended)
- Email: rn53themes@gmail.com
Remote Desktop Support
Our team always helsp you to support Remote Desktop Support kindly follow the below procedures.
- TeamViewer: Download TeamViewer
- Install TeamViewer.
- Send us your
Your ID and Password.
Editing
To edit the files in this template, you need a text / code editor software installed on your computer. Below, there are some popular free code editor softwares:
- Sublime Text (Recommended)
- Notepad++ (Windows)
- TextMate (Mac)
Troubleshooting While you are installing sometimes you get some general issues like installation failer, something wrong issue, data not fetching, 404 issues, page not opening, and more
How to access Admin panel?
Once you successfully complete your installation, kindly find the below steps to access your Admin-panel.
- Open your website on browser
www.yourwebsite.com/ - Enter this
admin/index.phppath after your domain name like below. www.yourwebsite.com/admin/index.php- Done
Demo admin login details:
Username: admin
Password: admin)(*
Notes:
Before start access the admin page you need to import the demo database first after only the demo login will work.
Once login with above credencials, you go to your setting page and change yoour admin login details.
Oops something wrong issue(Data not insert)
Reason for the issue:
SQL: Set default value to NULL for all columns without default value
Symptoms of the issue:
Oops something wrong - messageForms not working
Solution for the issue:
Disable the MySQL strict modeThen upload our demo DatabaseDone
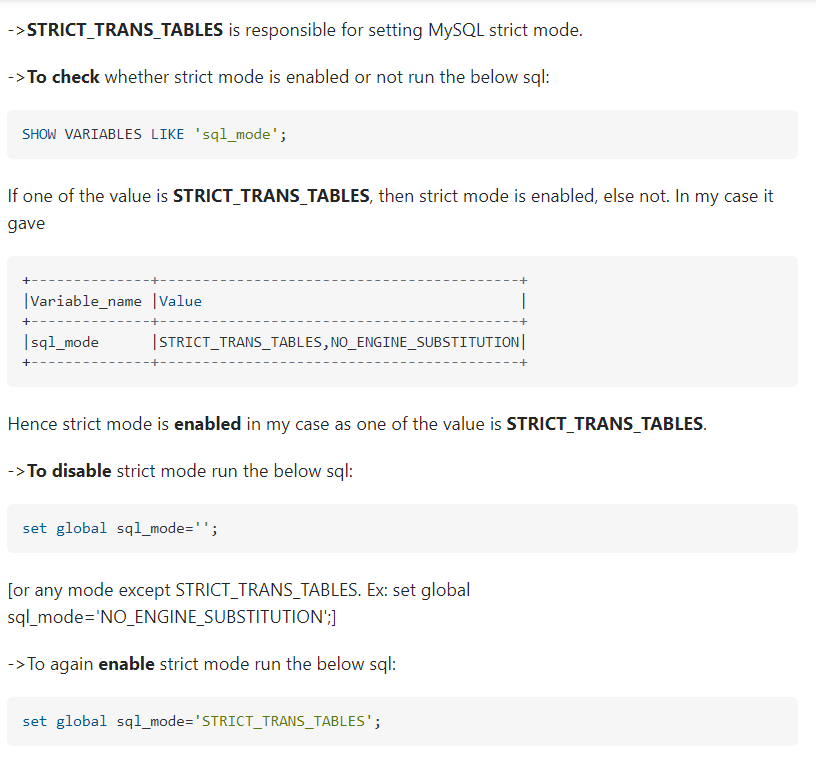
Steps to check MySQL strict mode enbled or not:
- Goto
phpMyAdmin-> Select yourDatabase-> ClickSQLtab, now you gettingRun SQL query/queries on databasewindow then copy & paste the below code and run. - ->To check strict mode run the this sql:
SHOW VARIABLES LIKE 'sql_mode'; Done- ->If one of the value is STRICT_TRANS_TABLES then strict mode is enabled, else not.
If strict mode is enabled means:
- To Change it permanently, If you have WHM access do the following- Type in command line/Terminal
sudo nano /etc/mysql/my.cnf - Then add the following
[mysqld]

sql_mode= - Save the file and restart the MySQL server
- Please contact your hosting/server provider.
- Inform them to Disable MySQL strict mode
How to Enable or Disable MySQL strict mode in local server:
- Goto
phpMyAdmin-> Select yourDatabase-> ClickSQLtab, now you gettingRun SQL query/queries on databasewindow then copy & paste the below code and run. - ->To Disable strict mode run the this sql:
set global sql_mode=''; - ->To Enable strict mode run the this sql:
set global sql_mode='STRICT_TRANS_TABLES'; Done
Importants of Setting page
Once you successfully complete your installation, you must complete your basic setting in your Setting page.
- Login to your
admin panel - Go to
Appearance -> Site Settingpage. - Website name: Just enter your website name.
- Admin Email [For All Mails]: Enter your website admin email id(Each and every email notification received this email only)
- Currency Symbol: Update your Currency Symbol here
- Name: Is this the admin profile name.. We can show this name in the top right corner of the admin panel.
- User name: Enter the new user-name of your admin panel.. this helps you to access your admin panel.
- New Password: Enter your new password of your admin-panel.. this helps you to access your admin-panel.
- Recovery Email [For Password reset]: Enter your secondary email id.. this helps you to receive forgotten passwords.
- Fav Icon: Upload your FAV Icon here
- SEO Title: Enter your website name(Max length 60-65 characters. ) here... This only index in all search engines like Google, Yahoo, Bing and all
- SEO Description: Enter your website descriptions here(max length between 120-150 characters)... This only index in all search engines like Google, Yahoo, Bing and all
- SEO Keywords: Enter your website keywords here... This only index in all search engines like Google, Yahoo, Bing and all
- Home page Banner: Upload your home page banner here.. This'll show on the background of your home page.
- Done
Logo upload and resize
Make your logo size 200px X 30px. While you uploading your logo in Bizbook template, you get some alignment issue or size issues, so you need to resize the logo, kindly find the resize instructions below.
- Login you
admin panel - Go to
Appearance -> Website logopage. - Upload your logo(Format accept .png, .jpg, .jpeg)
- Set your logo size like width
190px, heightauto - Done
Language not support or Words not display
Some times words or Languages not support or not display issues. kindly find the instructions below.
This kind of an issue happend from DB not accept different language and words.
- Go to your
phpMyAdmin - Select your
Database - Select the
Operationson top of the page. - Scroll down to
Collationsection. - Choose
utf8_unicode_ciand Save or Go - Done
How to change currency symbol
Easy to change your currency symbol via your Admin panel. kindly find the instructions below.
- Go to your
Admin panel -> Site Setting - You can view the
Currency Symbolfield on the page. - Now you can change your currency symbol here.(We put some dummy symbol here "$" you can can change it)
- Click "Submit changes" button below and save.
- Done
Mail not trigger or mail received
If trigger mail not works means, kindly find the solutions below.
- Go to your
Admin panel -> Site Setting - Change your "Admin Email [For All Mails] :" id.(We put some dummy "rn53themes@gmail.com" email you can change it)
- Click "Submit changes" and check now... Now emails received or not(How to check? Ex: Register a new user)
- If the email does not works means
- Open
mail_check.phpfile on your websitewww.yourwebsite.com/mail_check.phpfile on your domain. or Click here to Download the file here - Enter your
From and To email idand click the "Send test" button.(This is for testing purposes). - If the mail does not work again,
please contact your hosting service providerand tell him toEnable mail functions - Check after a few hrs and it works.
- Done
How Sub-Admin works?
Sub-Admin helps you to simplify your works. You can able to create multiple sub-admins with different credencials.
Tutorial videoHow SEO works?
Once you launch your website means Search Engines index it seems to take as little as 4 days to 30 days.
When you publish a new listing, events, blog post, site page, or website in general, there are many factors that determine how quickly it will be indexed by Google. For example, site popularity, whether the content is crawlable, and your overall site structure.
Google or other Search Engines Index"Google Search Console" help you to improve SEO score
- Google Search Console help you to manage and indexing your website fast and easy.
How to solve "Not Found" or "404 issue"?
Some times you getting the 404 issue.. It happent from mis-configuration or you missed any installtion steps while you installing the template.
Kindly recheck below steps you done or not before contact us.
- : Create new DataBase
- : Import our demo DataBase to your DB
- : Configure your DB information in db.php(admin\config\db.php) file
- : Configure your
folder pathin.htaccessfile.
2.10.1 How to find the .htaccess file in server?
- Login you
c-panel - Click Setting on top right corner button
- Preference window will open
- Enable
Show Hidden Files (dotfiles)option - Click Save it.
- Now you find your .htaccess file then replace Bizbook .htaccess file
Update 3.1 Complete template update(all files)3.2 Latest version update(only updated files)
Complete template update(All files replace)
First you need to know what version you currently using... so you go and check our product details page on Themeforest.
3.2.1 Download latest files from Themeforest
First you Download all our latest PHP files from Themeforest then replace all existing PHP files... after you need to update MySql DB
3.2.1 Before update take Backup your old files:
Before updating the template you need to backup all your files from server.
- Backup you
Databasefromphpmyadmin - Backup your all project files from your server like
PHP files, all_texts.php, .htaccess - If you customize or edit any files you can backup that files too.
3.2.2Replace all files(PHP files & all)
- Replace all the existing files with your new files before that you need to backup if you edit or configure files like
.htaccess,admin/config/db.php,admin/config/all_texts.phpandimages/folder - We hope you have done lot of edits in
all_texts.phpfile. So you need compare this file with latestall_texts.phpfile. You get the latest file from Themeforest. And use this tool to comparing the file and update.
Latest version update
Download latest files below and replace your existing files.
3.2.1Download latest version files
If you using the older version you need to download the all higher version tables
Ex: If you using version 3.8 means you need to download version 5.3 & 5.7 & all latest version tables
-
Version 5.7.14 01 Oct 2022
Bug fixing
- Google login updated.
- "Lazy loading" attr updated all image tages
- Home page search bug updated.
Updated files below
header.php style.css home_page_inline_css.php google_config.php google_login.php index.php index1.php index2.php index3.php index4.php index5.php index6.php index7.php index8.phpDownload all files -
Version 5.7.12 21 Aug 2022
New implementations:
- PHP latest version V8 updated.
- Page(URL) rename via admin panel: Now you can able to change your module URLs - https://bizbookdirectorytemplate.com/admin/admin-page-url-setting.php
- Home page Search option updated.
- Home page 1 - Design updated
- Home page 2 - Design updated
- Loading Speed optimized
- "No of coupons" count option implemented in Pricing plan page, control via admin panel
- Pricing plan.
- Browser cache enabled(ti's enhances page speed).
- City search implemented to all major modules home pages(Experts, Jobs, Travel, News, Event, Blog & Product)
- News & Magazines: "City or State location" field implemented
- Travel module: "Category" field implemented
- Events & Blogs: "Category" field implemented
- Product search implemented.
- "Text editor" - implemented for all textarea fields.
-
Version 5.7 02 Feb 2022
Download Table
New Module: News & Magazines
>News & Magazines new module with best class UI design. >News & Magazines - admin panel supporing files updated. >"Oops something wrong issue" updated. >PHP higher version supporting issue updated. >Index1.php UI changes updated. >Index2.php UI changes updated. >Responsive UI changes. >Social Share options updated. >Sub-admin credencials updated. >Job module bugs updated. >Php Errors n warnings updated. >City dropdown updated in home page >all_texts.php file updated depends on latest files. -
Version 5.3 18 Nov 2021
Download Table
> <b>New Module</b> : Service Expert(Bizbook help you to book your Service Experts for your home needs like Urban company.)
>Service Expert Features 1: Book your right Service Professional
>Service Expert Features 1: Unique Expert Profile page
>Service Expert Features 1: Lead management
>Service Expert Features 1: All services like AC, LED, Bike, Plumbers, Home cleaning and all
><b>New Module : Job Portal</b>b>(Post jobs on our Job portal to find skilled resources of Persons with disability and applicants can able to apply jobs easy.
>Job Features 1: Post job openings
>Job Features 1: View applicant profiles
>Job Features 1: Unique Job Profile page.
>Job Features 1: Job descriptions & job summery
>Job Features 1: Skill set, company profile & more)
>Admin panel complate UI change with more user friendly
>User profile page updated
>Admin panel: Graph updated
>Admin panel: Logo size adjust
>Admin panel: Color setting(Change all colors in one page)
>Admin panel: Features Enable & Disable
>Admin panel: Media Libery Mangement
>Admin panel: Drog & Drop options for change positions like Search order, Categoryes and all
>Admin panel: LHS menu auto-select
>Home page: Slider implement
>All Listing page: UI update
>All Events page: UI update
>Event datil page: UI update
>All Blog page: UI update
>Blog detail page: UI update
-
Version 3.8 04 Sep 2020
> Admin password encryption using MD5
> User password encryption using MD5
> Automatic password generate enabled in Forgot Password section
> Reponsive issues
3.2.2Mysql tables import
- Step 1: Go to
phpmyadmin - Step 2: Select your
Database - Step 3: Click on Import tab
- Step 4:
Uploadtheabove downloaded file(If any database attached)orlatest tableone by one. - Step 5: And Click Go button
Included Files A bit about the template files included in the theme.
Html Files
In the unzipped archive, you will find the following html template files:
| File Name | Description |
|---|---|
| index.html | The main home page template, this page has covered search option, services, trending category, top service provider, feature events and more.. |
| all-listing.html | All listing page have lot of special features like instent search, quick view, quick enquiry, get quote, category filter, feature filter, sub category filter, rating filter, post ads and more |
| listing-details.html | This detail page show up the listing details like listing name, address, contact details, listing guarantee, services offer, photogallery, special offers, 360 degree view, map, rating and reviews and more options |
| login.html | This login page help ful to make user login, sign-up and forgot password |
| pricing-details.html | This page showing listing pricing details and all. |
The main html template file is index.html
Php Files
In the unzipped archive, you will find the following php template files:
| File Name | Description |
|---|---|
| header.php | If you want to changes any header details(title, descriptions, keywords, css link, font links and other meta deatils) means, this file useful for you. |
| admin\config\db.php | This page is most important for this template, page contain with DB details. |
The main html template file is index.html
Sql Files
In the unzipped archive, you will find the following sql template files:
| File Name | Description |
|---|---|
| db/db.sql | This SQL file contain all demo datas, if you wants our demo data means, you can import this file into your db |
Css Files
In the HTML/css folder, you will find the following structure:
-
css/
- style.css
- bootstrap.css
- fonts.css
- jquery-ui.css
- icon.woff2
The default css stylesheet of the theme is style.css
Script Files
In the HTML/js/ folder, you will find the following structure:
-
js/
- bootstrap.min.js
- custom.js
- html5shiv.js
- jquery.min
- respond.min.js
- jquery-ui.js
The main javascript files of the theme is custom.js
Icon Files
In the HTML/css/ folder, you will find the following structure:
-
css/
- Materializecss Icons
- fonts.css
- icon.woff2
The above fonts are same font family and it's support all browsers.
view more Materializecss Icons MaterializeCSS Icons
Coding Structure A bit about the usuage of the advanced functions.
3.1: SOURCE CODE STRUCTURE: HEADER SECTION
The header section defind for meta tags, website title, fav icon, google fonts and style sheets(css files)

- Meta tag : The meta tag provides metadata about the HTML document. Metadata will not be displayed on the page, but will be machine parsable. Meta elements are typically used to specify page description, keywords, author of the document and more
- Title tag : Title for your website
- Fav icon : Favicons appear in the browser tab, address bar, browser history, bookmarks bar, etc
- Google Font : A simple and easy way to add custom google fonts to your website.
- Style Sheets(CSS Files) Style Sheet files
3.2: SOURCE CODE STRUCTURE: BODY SECTION
The body section defind for header, slider, band, services, free consultant and more..
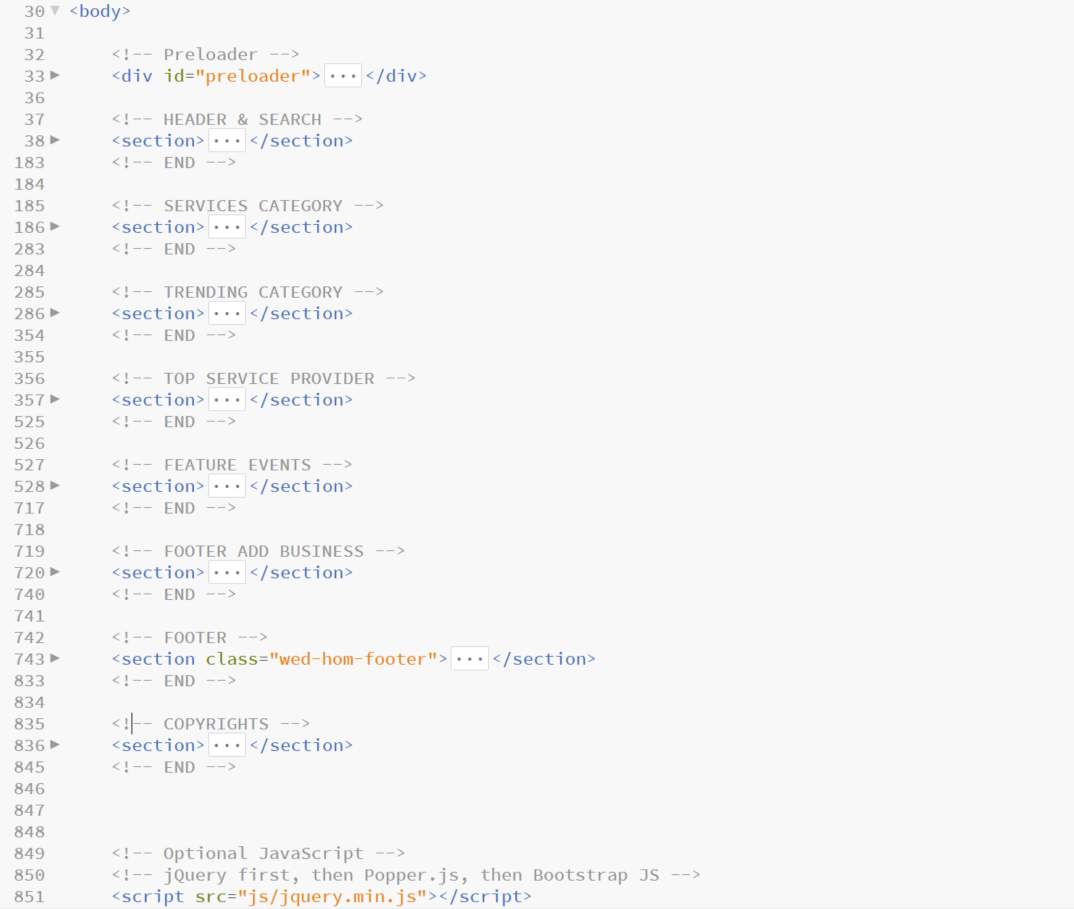
- Pre loader : This division shows from before website loading.
- Header : Contain logo, login details and search options
- Services category : This section showing the service category
- Trending cetegory : Contain the trending categoy listings
- Top service providers : This section showing the top service provider details
- Feature events : This section showing the feature event with image and caption
- Footer add business banner :
- Footer : This footer section common for all pages and it's covered quick support, top category, trending category and more quick links.
3.3: SOURCE CODE STRUCTURE: FOOTER SECTION
The footer section defind for tips before travel, popular travels, contact details and copyrights
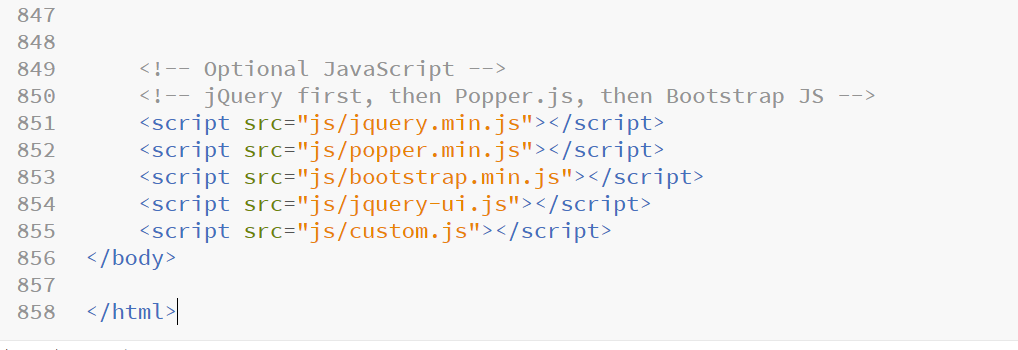
- Tips before travel This section contain Tips before travel, customer testimonials and Arrangements..
- Footer 1 This section show Offer tour packages and Popular Vacations
- Footer 2 This section show Address,Subscribe,FAQ,Locations and Social Media.
- Footer Copyrights Copy rights section
- Script files All Jquery and JavaScript files here.
Tutorials A bit about the usuage of the advanced functions.
Tutorial videos
-
Install on live server - Step 1
Tutorial video -
Install on live server - Step 2
Tutorial video -
Install on live server - Step 3
Tutorial video -
Final Step for - Bizbook Template Installation
Tutorial video -
How to install this on Local Server?
Here you can learn how to install "Directory Finder Template". Extract your downloaded file and open PHP folder
Tutorial video -
How to create duplicate listing?
This awesome feature make your business easy and save your time. This duplicate listing can copy from your previous listing to make a new listing with in a minute.
Tutorial video -
How to add new listing?
Here we provide the easy way to add your listing within a minute. You can update your business info, services, offers, photos, location, 360 view and additional pieces of information.
Tutorial video -
How like listing function works by Directory Finder
Our website template allows a lot of personalisation and customisation on the customer dashboard. Customers have the facility to like a listing that catches their interest. Not just that, this liked listing automatically is pushed on to their dashboard.
Tutorial video -
How to follow and un-follow works?
Directory finder provides follow and un-follow options for users. The users can able to follow other favorite users, once you follow the user means you get the users activities like new listing, blog posts, events updates and more via dashboard notification panel.
Tutorial video -
How to add new Sub-Category?
Just a few clicks to add your listing sub-category within a minutes. You can able to add multiple sub-categories at the same time.
Tutorial video -
How to add new category?
Just few clicks to add your listing category within a minutes. You can able to add multiple categories at the same time.
Tutorial video -
How to add new Country?
Directory Finder admin panel provides an easy and unique way to update the country fields within a minutes and simultaneously you can able to add multiple country fields at the same time.
Tutorial video
HOME PAGE
3.1.1: Change logo
- Open up
index.htmlfrom the /HTML/ folder - On find this class".ic-logo ", here update your logo path.

3.1.2: Searchbox value update
- Open up
custom.jsfrom the /HTML/js folder - Go to search function
- Common search: Update your search terms one by one.
- City search: Update your city names one by one.

3.1.3: Home page services box
- Open up
index.htmlfrom the /HTML/ folder - Image size: Service category image size should be 640 X 480 px
- Image format: You better to use .JPG, .PNG or .JPEG image format
- Image compressed: Please compressed your images before upload to server, it's helpful for increase page loading time. You can use this website for compress your images www.tinypng.com
3.1.4: Home page trending category
- Open up
index.htmlfrom the /HTML/ folder - Image size: Trending category background image size should be 640 X 960 px
- Image size: Trending category tail image size should be 150 X 150 px
- Image format: You better to use .JPG, .PNG or .JPEG image format
- Image compressed: Please compressed your images before upload to server, it's helpful for increase page loading time. You can use this website for compress your images www.tinypng.com
3.1.5: Youtube video
- Open www.youtube.com
- Get iframe code from your video(Ex:Right click over the video and copy your iframe code)
- Open up
index.htmlfrom the /HTML/ folder - Find the class name ".country-inn" and replace your ifame code to execting code

ALL LISTING
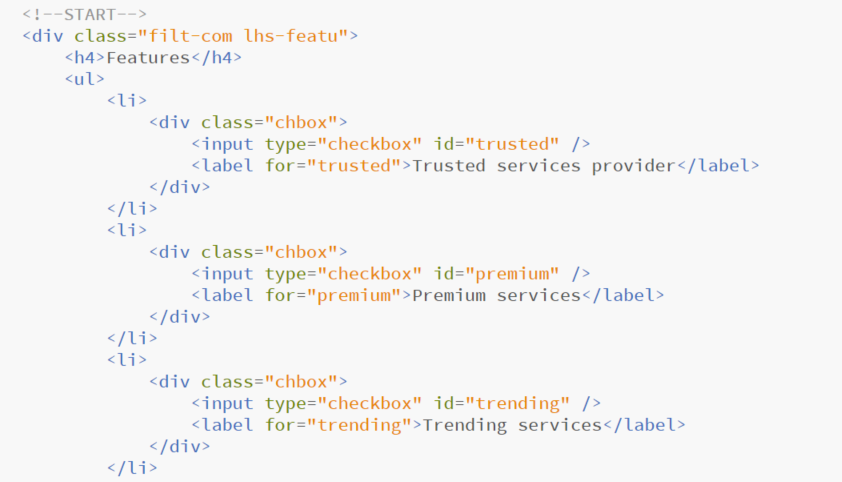
3.1.6: All listing page: Add new feature in LHS feature filter
- Open up
all-listing.htmlfrom the /HTML/ folder - You can copy one "li" tag and page it the same place.
3.1.7: All listing page: Add new sub-category
- Open up
all-listing.htmlfrom the /HTML/ folder - You can copy one "li" tag and page it the same place.
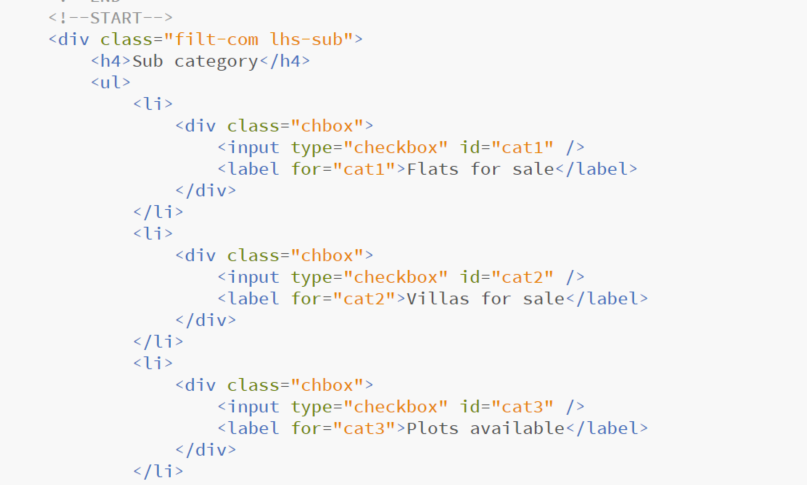
3.1.8: ADS banners on LHS
- Open up
all-listing.htmlfrom the /HTML/ folder - Image size: Service category image size should be 590 X 300 px
- Image format: You better to use .JPG, .PNG or .JPEG image format
- Image compressed: Please compressed your images before upload to server, it's helpful for increase page loading time. You can use this website for compress your images www.tinypng.com
3.1.9: Add new listing in all listing page
- Open up
all-listing.htmlfrom the /HTML/ folder - Find this class name "all-list-sh".
- Each and every listings inside the "li" tag
- If you need any additional listing means you just copy and past "li" tag like below
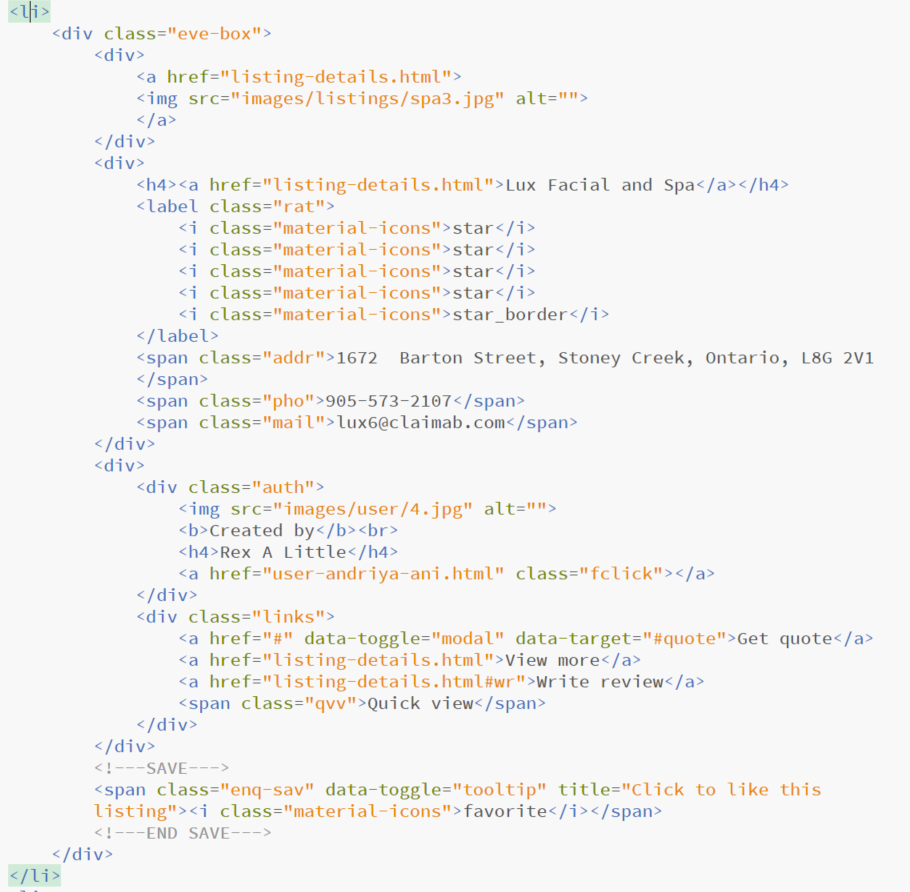
3.1.10: Listing quick view
- Open up
all-listing.htmlfrom the /HTML/ folder - Once you clicking the "Quick view" button then showing short information on right panel.
- Mouse leaveing option disable: Just remove below code from
js/custom.js

3.1.11: Listing rating
- Open up
all-listing.htmlfrom the /HTML/ folder - Rating icons you can refer this link
www.materializecss.com/icons.html

LISTING DETAILS
3.1.12: Listing detail: profile and banner image
- Profile image size: listing banner image size should be 250 X 250 px
- Banner image size: listing banner image size should be 1600 X 400 px
- Image format: You better to use .JPG, .PNG or .JPEG image format
- Image compressed: Please compressed your images before upload to server, it's helpful for increase page loading time. You can use this website for compress your images www.tinypng.com
3.1.13: Listing detail: slider
- Slider image size should be 700 X 450 px
- Copy "carousel-item" div and paste it bottom
- Image format: You better to use .JPG, .PNG or .JPEG image format
- Image compressed: Please compressed your images before upload to server, it's helpful for increase page loading time. You can use this website for compress your images www.tinypng.com

3.1.14: 360 Degree MAP
- Find this class name("list-360") on
listing-details.htmlfrom the /HTML/ folder - Copy your code from execting code
- Open your 360 image on google(click share or embed image)
- Get your iframe code from google and paste execting code
- Note: Remove all inline css

3.1.14: GOOGLE MAP
- Open up
listing-details.htmlfrom the /HTML/ folder - Get your iframe code from google map
- Note: Remove all inline css

LOGIN AND REGISTER
3.1.6: Login
- Open up
login.htmlfrom the /HTML/ folder

3.1.7: Register
- Open up
login.htmlfrom the /HTML/ folder

3.1.8: Forgot password
- Open up
login.htmlfrom the /HTML/ folder

Template customization We help you to implement your customizations on your project with low cost.
Template customizations
Any customization regarding our template like design, additional functionality or new module anything we will help you to implement.
If you need any customization please contact rn53themes@gmail.com
Template issues or bugs
Maximum no issues in our template if you found any issues or bugs kindly let us know our support email rn53themes@gmail.com we will help you to solve.
File Sources A bit about credits & file resources of assets used in theme.
Script Sources
Font Sources
Css Sources
Image Sources
Note: Images used in the theme preview are only for demo purposes and not included in the main download.